Monday, November 4, 2013

Fireplace Mantel Started

This weekend I began creating a fireplace mantel.  I've never done this before and I was a little worried about creating it.  My wife and I wanted the mantel to be made out of a hardwood like cherry.  Years ago I made an end table for the room out of cherry and liked the look of the wood.  When I started to calculate how much the mantel would cost out of cherry I got even more worried.  I toyed with the idea of making it out of pine first as I saw a woodworking show do that.  It would have allowed me to work through any kinks and cut down on mistakes.   I didn't go that route just for the sake of time.  

I started by drawing up a few designs for the mantel profile.  I knew I wanted a cove detail.  Once I found a design I liked, I knew I would have to mill the cherry myself.  No way was I going to pay some lumber company to mill the wood into moulding; that would cost a fortune.  

For the cherry I used on the end table I went to Pittsford Lumber.  They have a great facility, every wood species imaginable.  A few months ago a friend told me about another place he uses for work, Lakeshore Hardwoods in Victor.  I got their website up and found their price list for wood.  They were two dollars per board feet cheaper.

Lakeshore Hardwoods had a very good selection of wood.  It was clean and organized.  As it turned out, for shorter lengths the price per board foot was lower.  I purchased 5/4 x 10 x 60 for the actual mantel and 5/4 x 7 x 24 for the moulding.  Looking back I should have just purchased another longer board but it was my first time.  All the cherry was rough cut so I had to run it all through my planer.  I planned it down to 1 inch thick and it came out beautiful.  

Next I purchased a half inch cove bit for my router.  That bit ran me $30 but I made all of the moulding for this project.  $30 might have covered one board made out of the cherry.  Doing it myself I could cut the thickness of the moulding to what I needed.  

It took me a little over three hours to build but our mantel is almost finished. Next is the finishing.  Filling nail holes, sanding sealer, sanding, a light stain and then wax.  It should be nice for years to come.

The bookshelves are next!
  
Rough cut cherry I purchsed at Lakeshore Hardwoods

Close to finished.  No real super design with the moulding but I'm happy with it.

Saturday, October 19, 2013

Garage Side Door Added

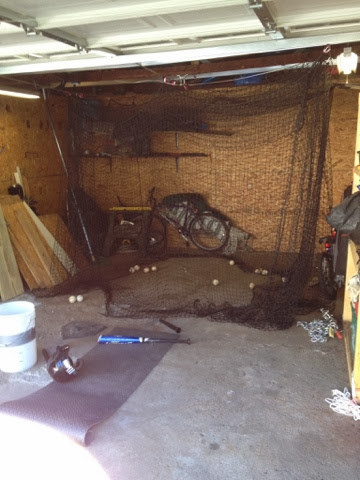
Today I installed a prehung side door on the garage. Our kids are using the garage batting cage every day so I wanted a way for them to get in easliy and/or for me to get in.  When the batting cage is open the garage door can't be raised up without pushing it back.  The door has a window which will let in some light and also allow us to look in on them too.

To install the door I had to remove the plywood inside to expose the studs.  I only had to take off two pieces so it wasn't that bad.  Next I moved one of the pressure treated studs I installed a few summers ago to support the wall.  I bought a prehung metal door 30 x 80.  It was for a rough opening two and a half inches bigger on height and width.  With my new rough opening I had to cut the old wood sheathing from the inside out with a reciprocating saw.  I removed the siding from that side just to make the cutting easier.  The cutting of the opening was a little hard to do but I got it.  

I made what could have been a huge mistake when I meaured.  I measured and thought a standard size door would fix.  I measured from inside the garage.  Outside the garage, the eaves I built years ago extend lower than the walls inside the garage.  Inside I had the room, but outside I was short almost two inches.  The door with the brickmoulding would not fit vertically.  I removed the brickmoulding and cut the sole plate out.  This gave me the room I needed.  I cut the moulding the fit.

I purchsed a lock set with dead bolt and that was a snap to install.  Tomorrow I will repair the siding I took off and do some work in the L-screen I built last weekend (I got some real fencing--the boys are just pounding that metal every time they hit--real fence would be stronger).


Tuesday, October 15, 2013

Window Trim

A late day, Columbus Day project completed yesterday, the small windows in our front room needed to be trimmed out.  It has been a long time coming.  I ready to design and build the fireplace mantel.  I had to have the windows trimmed out before I could start the mantel--placement of the top shelf could have interfered with the underside of the window.  All of the trim in the house looks like this so I just had to go to one of the other windows and copy what I did to make the ones out in the addition.  

I used pine as the trim will be painted (the mantel will be cherry).  I used a lot of the scrape wood I had in the basement for this project.  Nice to be able to use all that wood up and still make it look nice.  I had to buy corner moulding and miter cut that around the corners.  Funny how I forgot all my tricks to do this quickly and accurately.  The second window went much quicker than the first.  


Saturday, October 12, 2013

Batting Cage is Up!

For years I've wanted to create a place for all three of my kiddos to practice hitting.  I built a place in the basement for them to swing but it wasn't the best set up.  A batting cage would be ideal.  I looked on line for a batting cage and discovered if I wanted to spend a thousand dollars, I could get a really nice one.  At the end of this summer I came across a website, www.ondecksports.com that advertised a custom batting cage.  I entered the dimensions of the new place I wanted to set the kids up in, our garage, and the website spit out the cost.  I wanted this batting cage to be eight feet high, ten feet wide and fifteen feet long.  I wanted to strength of the twine to be the toughest I could afford.  The site spit out the price of two hundred and thirty dollars!  I couldn't believe it.  All the other sites, for the same dimensions, would have been hundreds more.  So I called the company to confirm the price and the quality.  Turns out, the site was correct. In fact for five dollars more, the salesman told me, I could up grade to the quality purchased by real batting cage places (#36).  

To use the batting cage the kids have to get in the garage and close the door.  No problem as they will be using this during the winter and will want the door to close anyway.  The way I designed it was the entire cage is held up by D-clips (spring loaded ones).  The clips are attached to a wire that the kids and I put up this morning in about an hour. Here's how we did it.

I purchased three twenty foot lengths of 1/4 plastic encased wire for $.59 per foot.  I also got wire six wire clamps, six lag eye bolts and three adjustable wire (I don't know what they are called but they allowed us to pull the wire tighter once it was up).

First we drilled the holes for the lag screws eye bolts at the height we needed.  Then we took a laser level and shot that across the garage to the other side.  We tried to measure but the garage wasn't square enough to get it accurate.  We then attached the wire to both side and clamp the wire through each eye hook.  We then used the adjustable part to tighten up the wire even more.  We did that on each side of the batting cage as well as on wire down the middle.  

Hanging the cage was easy.  We attached four large d-clips to the corners and then hooked them on the wire.  We then took several other d-clips and attached them along each side and down the middle to the wire to tighten up the cage.  Done! 

When the kids are using it they can pull it out, once the door is closed.  They have to push it along the cables to put it away so they can exit the garage.  The whole thing can be pushed against the far way out of the way when the are done.


Saturday, October 5, 2013

Let There Be Light!!!

After years with no power out to the garage- we now have the power!

When the foundation to our addition was dug, the UF 12gauge electrical wire was severed.  That killed all the power to the backyard.  Then we built our back patio and installed a pool which cut the backyard off.  Last summer, Ryan and I dug a trench from the house, around the pool and to the garage.  We finished the siding of the garage.  I had just enough time left in the fall to run all the electric for the garage, then the snow came.  I never knew if the wire I installed underground would work.  

The wiring sat all summer.  I installed a light above the basketball hoop but it wasn't working yet.

Today was the day.

I started by drilling a hole into the side of the house for the underground wire from the garage. I encased it in electrical piping.  Then I spent some time wiring the fuse box out in the garage with two 15 amp breakers.  I also wired two switches on the garage wall, one for the inside lights and one for the outdoor lights.  The work inside the house was to install a new breaker for the garage.  This is always nerve wracking because of all the power going to that fuse box.  One slip with the wire and I would get lit up.  Thankfully, that didn't happen.  I installed a 30amp breaker to cover the garage.  

First time, hit the switches and they worked!  We are one step closer to setting up the batting cage in the garage--now that we can see!

Sunday, August 18, 2013

Stained Old Playset

Today I spent a few hours staining an old playset we got from my brother in law.  I used a solid stain and am brush to apply it. Didn't think it would take long but their are a lot of surfaces to cover. I also had to make sure I got everything from above as well. Our windows on the second floor can see the top. 

Wednesday, June 26, 2013

Solar Cover Holder

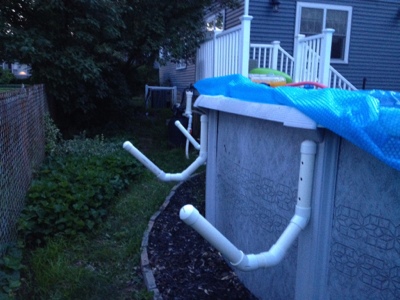
Our first summer project was a solar cover holder to attach to the pool. We have never used the cover because when the kids get in to use the pool they can't do anything with the cover. They end up pushing the cover to one side which takes a lot of room.  I looked up this project on Pinterest and then made it. Works pretty good. 
I added a bar across the middle. This new version holds the cover up better by not allowing the cover to sag through.  

Made from 2 inch PVC pipe screwed directly into the plastic pool columns.  

Tuesday, April 2, 2013

Basketball hoop on the garage

Years ago our garage had a basketball hoop on the garage. It wasn't installed at the right height and, as it turns out, was just a piece of plywood with a metal hoop. When I resided the garage I took that hoop down. It took me most of last summer to get the garage into the shape I needed to finish the siding. I put up sheets of plywood to strengthen the sides, wrapped it in left over Tyvek and then began the siding towards the end of the fall. We couldn't decide on a stand alone basketball hoop or to put one on the garage. Last summer ended and no hoop.

My boys really wanted to shoot hoops so a garage hoop was chosen.

Now I have a lot of experience with many projects under my belt. When the guy at Dick's Sporting Goods said the install was pretty easy, I believed him. He was wrong. Putting the basket together was easy but installing it on the garage was a different story. I bought a 3 in 1 basketball bracket. That thing had so many parts. Three configurations meant there were holes stamped in all the metal parts. Wouldn't have been bad if the directions were better. Written in five different languages didn't really help--especially if all the written direction were as crappy as the English ones. The drawings were very hard to read making it even more difficult to tell which hole to put the different bolts. All of that said, it got done.

To install the backboard at exactly ten feet I was not too excited to carry the backboard up a ladder. Instead, I backed my minivan up to the hoop site and stood on top of that. Good thing I did that. The backboard slipped and I was just barely able to catch it before it fell completely off. I would have been flat on my back in the drive way. It took a little bit of work to get the bolts in place and I had to buy a large socket but it went together nicely.

This was definitely not an easy install- Mr. Dick's salesman.

Wednesday, March 13, 2013

The Fireplace Stone is Finished!

The stone veneer for the fireplace is completely finished. I had just a few more pieces to put up and then I gave the entire stone a treatment of stone enhancer.

As it turned out I ordered exactly the amount of veneer I needed. Not like the stuff cost billions of dollars it was just none of it could be returned. This was a special order product which means they ordered it from their warehouse in Syracuse. The tile store's policy is they do not take returns on special order items. To me a special order item would be one that was custom in some way (ordered from Italy, cut to fit, a color made especially for me). I would have like to return the four I have left over as I have no need for them anywhere in my house.

Today I was able to clean the stones and then apply a stone enhancer. The stone enhancer was called One and Done. I applied it with a stain brush and worked it into the cracks and crevices. I had to make sure the get under the stones that hung proud and on the sides of stones. The directions state the product should sit on stone for a few minutes and then the excess wiped off.

The picture below shows the difference between the enhanced and the natural look. I think the enhancer really brings out the colors in the different stone and pushes back the grey stone colors. I really like all the golds and reds in the stones.

The second picture shows the finished stone project.

In the coming weeks I will be building the mantel. We are still deciding whether to go with a white painted mantel or natural cherry. Either way the plan is to build the mantel so it wraps around becoming the top to bookshelves I will build. I'm hoping to make the bookshelves removable so I can get access to behind the fireplace, just in case I need to for some reason.


Monday, March 4, 2013

Stone Veneer For the Fireplace

This week I will be working on the stone veneer for our fireplace. To begin this project my wife and I had to settle on the type of product we wanted to use. We wanted a product that had a stones with various colors (greys, reds, oranges, browns). Many of the products at Home Depot or Lowes had tan shades. We were interested in a product from Lowes, from the name brand Stone Craft. This type of stone is traditionally used the exterior as siding. It rages in width from one inch to two and one quarter inches. It must be installed, stone by stone. We found a pattern we liked but I decided to check a few tile stores to see what they had to offer. The second tile store had a stone veneer with all the colors above. The veneer is a stone product that ranges in widths from one and a quarter to half an inch. The stones are epoxied together to make a ledgerstone. It cuts like tile and installs like tile. See the pictures below.

To attach it to the wall I put up a board to represent the mantel. That will give it support has the mortar dries. The mortar is a polymer blend recommended by the manufacturer. I mixed it to a peanut butter consistency or until it wouldn't fall off my trowel easily.

The manufacturer suggests using a 1/2 inch notched trowel on the wonderboard. They also suggest back buttering each piece. I started by installing one entire row, the row that would be just above the mantel. The corners are created with a special type of the rock product. The corner stones have rough edges. I cut the corner tiles in half and over lap them on the corners.

Installation of the product was a lot like regular heavy tile. Professional would have started from the top and worked their way down. This is done to avoid dropping mastic on the finished part. I wasn't confident in how the bottom would turn out if I started at the top. As it happened, the top was uniform and straight. I left a gap at the top that will allow me a space to add drywall for the ceiling (ceiling should have been down first but we are still living in this room so..).


Sunday, February 17, 2013

Fireplace Framing Ready For Stone Veneer

Yesterday I installed Wonderboard over the framing that will be covered with a stone veneer. I could have just installed plywood but then I would have had to cover that with a wire mesh. One extra step that would have saved me only a little money. Wonderboard product was ten dollars per sheet and I used four sheets. I think plywood and the mesh might have cost me thirty-five dollars.

Wonderboard is easy to cut and provide a solid backing for tile or the stone veneer I want to use. My wife and I are still picking out the stone product. I would like to install it rock by rock. This will give me the most control over the look. There is a tile product that installs, well like tile, but has that stone layered look. It is really expensive but easier to install.

I have left the side open on both sides. Just because I never want to tear this thing apart once it is built, I'm trying my best to create this so we can fix it should it break. On either side I will be building shelves. The mantel will not only be in front but also wrap around and go on top of the shelves. I'm installing a nailer on the back wall that will support the entire top. The shelves will be fit in place so I can remove a few screws and take the shelves out completely. Still working on how that will be done but that is my plan.

Fireplace surround framing

This weekend I started and finished the fireplace surround framing. Strange, not many pictures or plans floating around on the internet about the framing. The few I found didn't really give good instructions (and this blog won't have any either). I suspect the reason for this is there are fireplace manufacturers recommendations for framing around the fireplace that is specific to the fireplace purchased. Also, depending on your design, the framing is also very specific.

With those two things in mind, I followed the manufacture's recommendations first. Now the design of our fireplace has changed quite a bit mostly because of the vent pipe above the firebox. I was told it would have a top exhaust, rather than a back exhaust, however I wasn't told the vent pipe would be almost three feet above the firebox. If you look at the picture, the vent is above the height of the windows. If I put the mantel above that, our mantel would be around 65' off the ground. This is too high for what we want. My wife would like to put things on the mantel and those windows are around the height she would like the mantel.

The framing was also influenced by the mantel and the material we would like to put on the face of the surround. We are going to use a faux stone product. Tonight I will be installing the cement board that will back this faux stone. Using mortar, I will adhere the stone to the wall. We wanted around five inches of stone on the sides of the firebox front. Above the firebox opening, there will be around seven inches. The minimum amount for this space had to be 13'. We wanted a little more so when we hang our stockings, they aren't in a place where they could catch fire! Our mantel will be either painted white (I will use poplar which paints very nicely) or made of cherry and stained. My wife is still trying to decide. I think either would look nice but I would like to do the cherry (what ever my wife wants). The mantel will not only be on top of the firebox but it will wrap around the sides and then become the top of two book cases I will build on the sides.

Lastly, I installed a new t.v. above the fireplace. We have really enjoyed having a t.v. in this old living room. Usually, my sons are playing Madden football on the other t.v., nice to another to watch from time to time. The original design had this t.v. installed on the main wall behind the firebox. Because of that vent pipe, I have to bump the wall out 16' inches. If you look at the framing, the wall goes straight up to the ceiling. The t.v. will be mounted on the front of this wall over the stone.

Sunday, January 27, 2013

Hitting area in the basement

Yesterday I put my ideas together for an area of the basement that I wanted to create for my kiddos. This project is actually the one that launched our basement remodel. My younger son and I were in the basement scoping out a place to put a baseball tee. All three of my kids play baseball or softball. It is so important for them to practice hitting off a tee. The more cuts at the baseball they can take, with proper form, the better they can get.

On our basement scouting trip I asked my younger son to hit the basement wall, on our south side, with a hammer. He hit it down low and what I discovered made me rip out the entire wall. I smelled mold and dirt. What I discovered was drywall touching the ground in the basement actually wicked up moisture. Moisture, not from water entering the basement, but just enough moisture from improperly installed insulation. The cold outside covered with insulation made water form. I should say improperly installed. I put foam insulation on the wall to give a barrier between the insulation and the wall. That product didn't exist. Also, I used a water barrier paint on the wall, that too wasn't in existence when the basement was finished years ago. Picking the drywall up off the floor an inch would have done a lot to keep the mold at bay.

I ripped out the entire wall. In the picture below, I installed metal 2 x 4s. My original thinking was to use this product as a way to put up something 'water proof'. On the other ways I used a pressure treated 2 x 4 on the ground and then wood studs. That turned out to be easier, faster and cheaper. The metal studs were easy to cut and put up but they were fairly costly.

In the picture you can see my idea for a hitting area. A ball suspended from a rope. The rope can be adjusted to different heights for my different height children. Against the wall, suspended from the ceiling, is an anti-fatigue mat. When one of them hits the ball, the force of the ball hitting that mat stops the ball. The ball falls back with a lot less power. By suspending the ball from the ceiling, it eliminates the need my kiddos to replace the ball on the tee. They can just take their cuts. We are still working over the design of the entire thing but as is, it works fine. Now we can just improve on it, looks and function. What I like a lot is, I can remove the entire thing in a few minutes. When I add a finished ceiling there, I can get a few extra ceiling tiles to put up when we store this hitting device. Probably over the winter, the kids will use it. During the spring and summer, I'll remove it from the basement. I'll pop out the ceiling tiles with the holes and install the whole ones.

The overall design of this hitting tool was actually created by my grandfather thirty plus years ago. He too thought it was a good idea to get his grandson swinging every day. My grandfather installed mesh between two trees and suspended a ball from the same tree. I sat with him while he made this thing, thinking it would be ready in minutes. After an hour of sitting with him and watching him, I got bored and ran off. When I got home, he was just finishing it. I tried it, over and over. When he left that night, he left watching me hit. I stayed out there until it got dark and then used that hitting thing every day. At eight, you really don't realize anything about time. My grandpa worked on that for around six hours that day. I would do anything to get those five hours near him now.

Monday, January 21, 2013

Drywall in our old living room

Yesterday I began, what for me, is the long process of drywalling the living room. I hate drywall. Not the hanging part so much but the mudding and sanding. I've done it all over my house and experimented with various ways of blocking the dust from leaving the area where I'm working. Nothing has worked very well.

I will tape and mud the joints today. Our goal is to do either a ceiling tile treatment (either tin or fake tin panels) or we might drywall over the existing plaster ceiling. What will not happen? We will not be taking the plaster ceiling down!

Our new fireplace should arrive next Monday which will put the install of the fireplace some time end of next week. After that we can begin building the new fireplace surround. We are still deciding how we want it to look.


Wednesday, January 16, 2013

Finding Out My House is Swiss Cheese

Yet again I've discovered another hole in the house! This one was big. The entire ceiling over the bay window opened up to the roof over the porch. There was no insulation, no covering at all separating the inside of the roof and our old living room. Standing inside the space under this ceiling you could feel massive amounts of cold air rush into our house.

I attacked this problem two ways. I needed to insulate the upper part of the wall because this wall is the lower part of the walls inside my boys' rooms. Large triangular spots on their walls were never insulated, even with that blown in junk that I filled the walls with a few summers ago.

To insulate the walls in that spot I first installed 2x4s vertically, toenailing them into the porch supports already there. Next I stapled insulation between those new studs. This got really challenging as the angle of the roof behind me pitched. I got poked by the nails of the roof above me. This is my own fault. I had access to this portion of the wall when I put the roof on the porch. At the time, I was so focused on doing the roof that I didn't inspect this area very well. Truthfully, I couldn't see the whole into my living room because of the plaster ceiling. This would have been so easy to do with the roof open!

The next order of business was closing up the opening. To do this I installed 2x6s across the entire span. I created pockets to hold the 2x6 insulation used in attics and on ceilings. This would give a R-19 to that portion rather than the R-13 for a 2x4 wall. The second I covered that with insulation, the draft was gone. Lastly, I covered the entire area with 6 mil plastic. Even though the paper on the insulation is a vapor barrier, there were spots where I filled in the insulation without the paper. Also, I want this buttoned up. I don't ever want to feel the cold sitting in my living room again.

Check out the pictures of the before and after. As crazy as this sounds, the Weekend Woodworker wasn't able to finish this project until Monday night. After working all day, I came home to work on this for the next four hours.


Monday, January 7, 2013

Basement Stairs and Another Wall Insulated

Saturday I worked hard to get another wall in my basement insulated. The trick with this wall, the basement stairs were right against the wall. I thought about this for about two weeks and then made my plan. Everything went just as planned--for once! This project had a massive potential for making big problems at my house. Without the stairs, we can't do laundry. If my wife misses one day without putting in laundry, the basement gets filled up!

To begin, I removed the steps. I used a circular saw to cut each stair down the middle. I then took my hammer and hit each part out of the dado created for each step. There were about five huge nails in each side of the stringers holding each step. Total over kill. I then took off one stringer and slide it out of my way. I cleaned and then painted the wall with a basement waterproofing paint. The wall was in good shape which meant I only had to fill in a few cracks with mortar.

Under our stairs there was a makeshift shelving system. I've always hated it and planned to redo it someday. Someday was Saturday. Discovered the entire stair system was being held up by two 2x4s! We dodged another bullet there. I beefed up the supports under the stairs with 4x4s and a studded wall. The stud wall really gives the entire platform good support now.

The wall was again treated with insulated foam board. This was also put behind the shelves.

The last step was to measure and cut new steps. The new steps were 29 1/2" wide. After a little trouble, I got them all in. I added 2x4 supports under each step to give them more strength. The steps will be carpeted so I used regular 2x10s for the stairs. If we wanted, we could have installed oak stairs but that would have raised the cost, big time. Carpeted stairs are fine for our basement remodel.

Really amazing how much warmer our basement is with these improvements. There are no heat runs in the basement but it is just as warm as the rest of the house.

In one of the pictures below you see all the crap back on the shelving unit. I made the base for two shelves but reused the plywood from the old shelves. I needed to stop the project and needed a place to put all that crap. I will be finishing that shelving area with plywood shelves, a wood panel against the insulation and stud wall at the back and to make the shelves look thicker, false fronts for each shelf.